Learn about Half Rectangle Triangles HERE
The Making of Quarantine Improv Quilt
Early on during this whole COVID situation we all had a ton of creative energy. When my state first put out the stay home orders my guild decided we would run a virtual sew along with improv prompts. I’m not exactly sure how many people actually participated but since I was creating and posting the prompts on Instagram it was a good distraction for me. This was also a fun project to try out some interesting materials and techniques.

The way the prompts worked is that I made a list of standard shapes found in quilts and picked one a week to base an improv block off of. My list was HSTs, squares, rectangles, log cabin, courthouse steps, applique blobs, triangles, flying geese, crosses, pluses, stripes, grid, and curves. We had roughly decided on an 8 week schedule and that we would keep going if there was a lot of participation and interest.
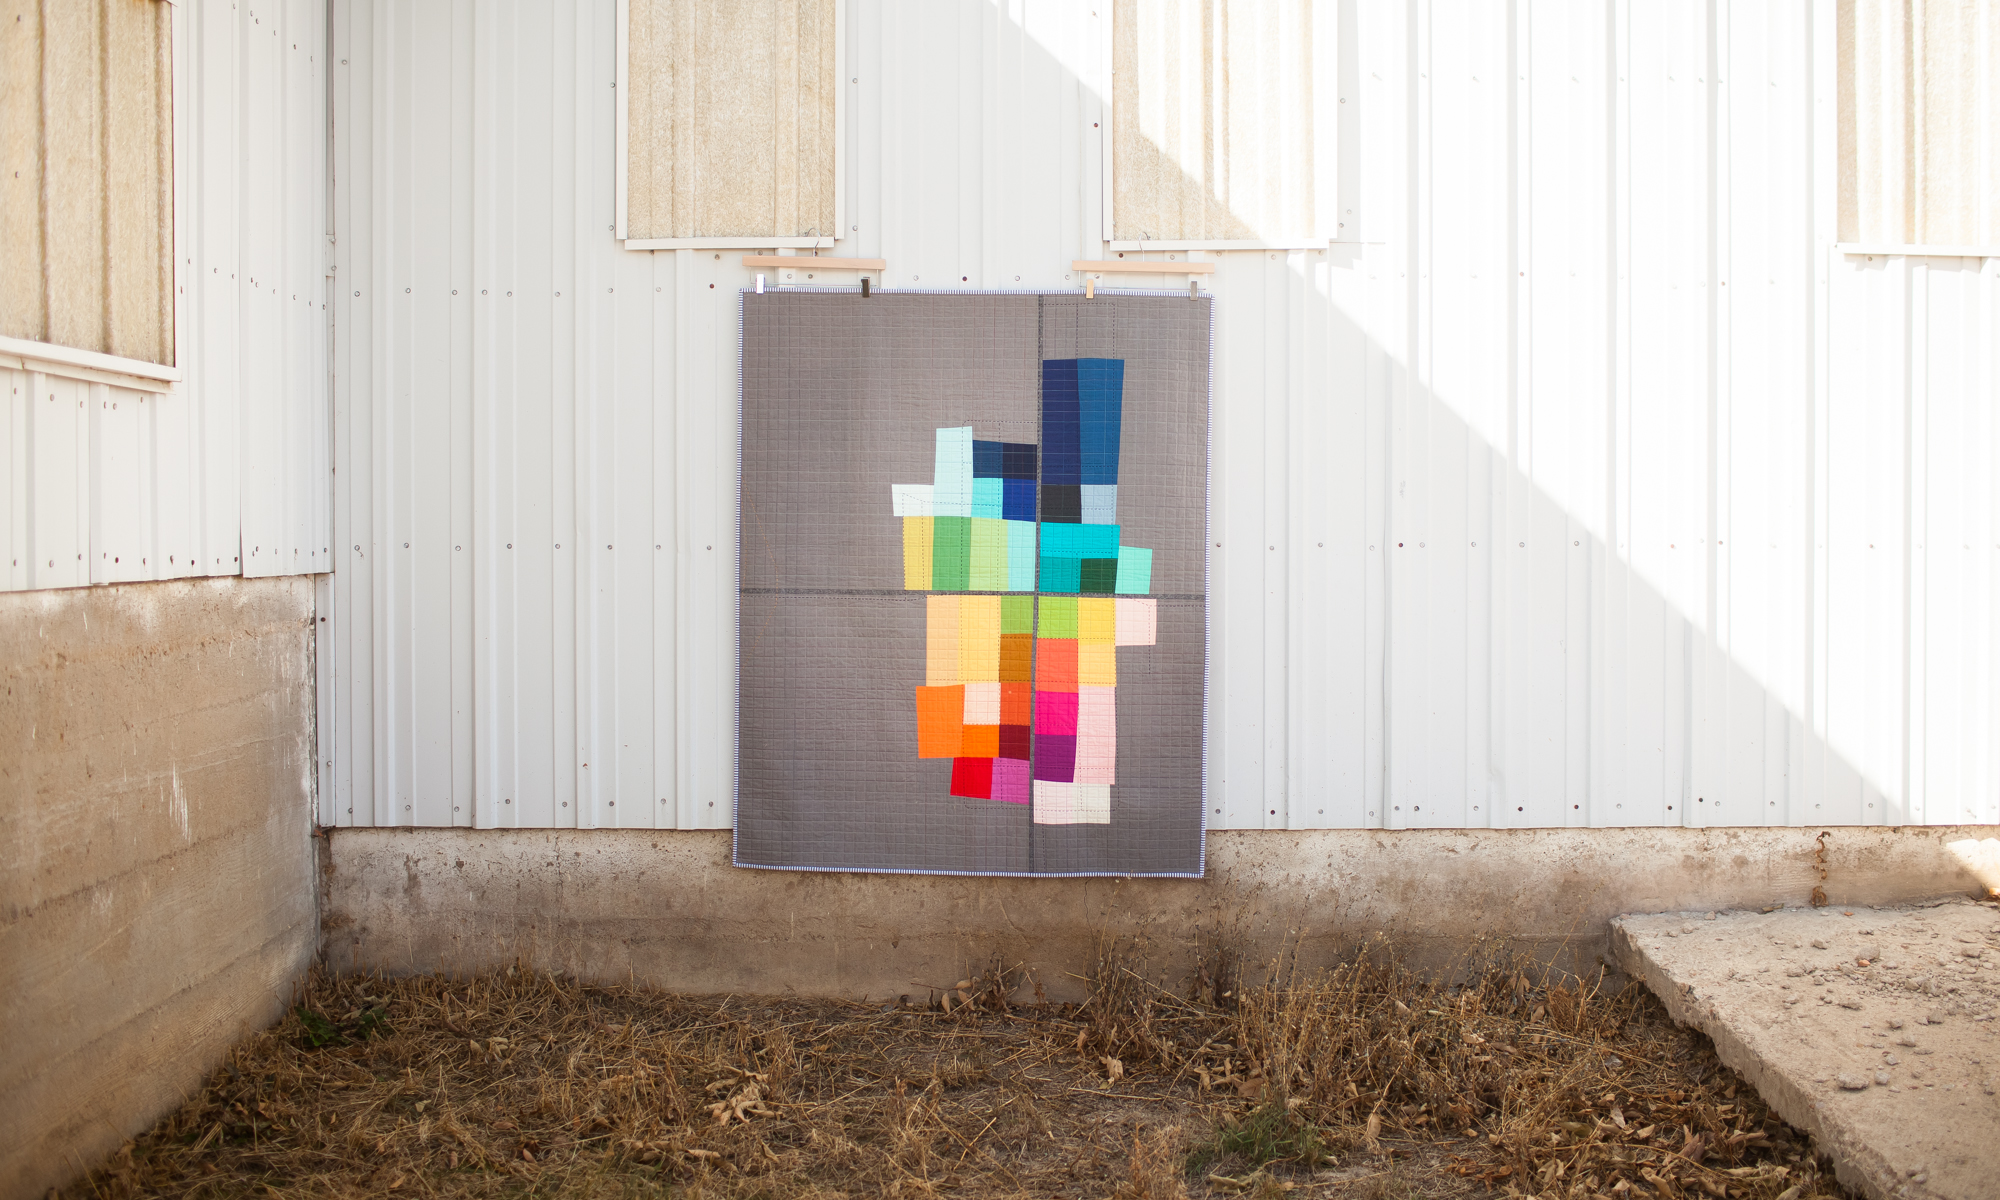
The first week I selected HSTs and constructed my block with a few parameters I set up for myself. I wanted to only use from my small scrap bins of low volume and Micheal Miller cotton couture solids. I had a lot of small pieces of the cotton couture returned to me at the end of my round robin quilt project and I felt this would be a good way to put a dent in them. I also decided I wanted my block to end up square, semi-large (over 9″), and that I would use my ruler but piece improv/wonky.


While assembling my first week’s block, I ended up making a last minute decision to put a large chunk of solid fabric on one side with a small strip of accent color. This was truly just a lazy way for me to get my block to be square but I ended up really liking it and thought it would be a good way to tie all the blocks together.


After the first several weeks I was struggling with the project. I feel like every quilt block looks better with bright pink in it so I was trying to squeeze it in but also use a color scheme on each block. At this point I was also knee deep in making masks every day while trying to keep my then first grader occupied for school each day. I was lacking inspiration and just doing the motions. For week 5 I decided to select a prompt I was excited about and go back to a color scheme with more pink. I was happier with this block than the previous weeks’ blocks. So moving forward I listened to my gut about color and fabric selection.


I felt like I was making progress and having fun just playing with the fabric again. Then after the week 7 block I knew my project had been saved and would not end up a pile of orphaned blocks. There was one more week in our official sew along but I decided to also make a ninth block so I could end up with a square quilt. After all my blocks were assembled I moved forward with the plan to hand quilt each block independently from each other. I would assemble the quilt in a makeshift QAYG way. At this point I knew I would just be experimenting.


I also decided to try to use up the black batting that I had scraps of so I quilted mostly with black perle 8. You can read my thoughts on perle 8 cotton for big stitch quilting here. After quilting each block I trimmed them to size. Then I stitched them together on the machine using a zig zag stitch. I wasn’t sure how I was going to bind the quilt since the quilt generally didn’t have the super polished, perfectly finished look because of the raw edges showing through the zig zag stitching. I ultimately decided to experiment with a bit of sheer fabric and whatever was lying out on my cutting table made up the rest.


I’m super happy with the final result of all my experimentation. This quilt finishes just over 30″ square. I plan to enter this into the small quilts category for QuiltCon Together 2021.
The Making of Social Distancing Quilt

When I first came up with the idea of creating a group quilt to illustrate the quilt community experience during social distancing, I don’t think I would have ever imagined that 4 months later the country would basically still be in quarantine.
I put out a call for quilt blocks the first day that our local schools were closed. I had spent the night before making some sample blocks and received the school cancellation notice late that night. This really solidified the reality of the pandemic for me. You can read about the inspiration for the blocks in the original call.


I was pleased with the excitement and interest people had for participating in the quilt. I was even interviewed for an article in the Winnipeg Free Press. Blocks started to slowly trickle in. I took precautions with my mail and “quarantined” everything in a ziplock bag for several days before opening.
This quilt was not the only group quilt inspired by COVID-19 and quarantine. I was also a contributor to two other quilts. In order to remember the blocks I made and sent away for those quilts I decided to make more Petri Dish blocks for this quilt in the likeness of those blocks. One quilt is by @stephskardal and @southbaybella, the other quilt is by @jenbroemel.


As the months went on and we were still staying at home, I kept collecting blocks and adding them to my design wall. I wasn’t sure exactly how I was going to assemble and finish the quilt but for some reason my mind kept coming back to the idea of a fence.


To me, the fence symbolizes the invisible force that is keeping us apart. So many barriers have come up during the quarantine starting with mundane things like toilet paper shortages and then more serious shortages of milk or meat or eggs, and the still developing things like economic downturn and human rights protests. Not to forget the lives taken or impacted by the virus.
Ultimately, I landed on creating a chain link fence using 1/4″ bias tape. This is also partly a tribute to the miles of bias tape ties that I made for masks during quarantine. [I’ve made just over 100 masks; read about my mask making here.] The fabrics I chose for making the fence links are an ombre effect of blenders; black to light gray. I did not use solid fabrics because one of the pandemic shortages happens to be solid black fabric. Yet another accolade to using what I had on hand or what I could source during quarantine.


Once I basted the bias tape fence to the quilt I kept the quilting simple and performed dual duty by stitching down the bias tape and using that as quilting also. The only other quilting is what I’m calling a “ghost block,” white stitches on white background fabric. This block symbolizes the unreliability of the international post and also any blocks that were started or designed by people with intentions of participating but did not finish or submit them. I knew I was expecting a couple blocks from overseas but because of the pandemic there was no way to know when exactly they would arrive. I had set a personal deadline so that I could finish this quilt in time to submit to a specific show, so I needed to make design decisions that would include any late arrival blocks but not affect the quilt top construction.


On the back of the quilt, which features Latifah Saffir chain link fence print fabric, I stitched a second “ghost block”. This time I used dark thread to make it like a portal where the late arrival blocks are trying to break through to the front of the quilt. I was able to applique just the Petri Dish portion of the overseas blocks to the back of the quilt. I love this little design element and it turned out better than I imagined it would.

I am so grateful for everyone who participated and made a block(s). I received blocks from 47 people in 21 different states, 2 Canadian provinces, and one European country. The youngest contributor was just 7 years old. And the furthest away blocks traveled here all the way from Paris, France. See the full list of contributors.
This quilt has been selected for a 2021 book curated by Sandra Sider, Quarantine Quilts: Creativity in the Midst of Chaos.
Improv Quilting – Part 1

Read about my approach on improv quilting HERE
Social Distancing Quilt Contributor List
A huge thank you to all who contributed a block(s) to make this project possible! These are the wonderful participants who helped in making this quilt a reality:
| Yetiva | Allen |
| Erin | Andrews |
| Danielle | Boucher |
| Brittany | Bowen Burton |
| Mary | Brockson |
| Jen | Broemel |
| Chantel | Calder |
| Lisa | Camp |
| Cara | Cansler |
| Kathy | Cook |
| Polly | Dredge |
| Audrey | Esarey |
| Ann | Feitelson |
| Mary Lou | Finch |
| Karen | Groves |
| Rachel | Guthrie |
| Cathie | Haab |
| Paula | Hampton |
| Patty | Heath |
| Sarah | Jay |
| Tom | Jay |
| Evelyn | Jay |
| Bill | Keller |
| Amanda | Loewen |
| Melissa | Mason |
| Flora | McLain |
| Lauren | Newton |
| Victoria | Pena |
| Susan | Perry Mason |
| Karin | Rabe |
| Sarah | Ruiz |
| Jessica | Schunke |
| Aurelie | Sicard |
| Julie | Sippy |
| Steph | Skardal |
| Shelly | Sommer |
| Agnes | Stadler |
| Brianna | Stapleton Welch |
| Jane | Stokes |
| Brenda | Suderman |
| Rebecca | Swank |
| Marty | Swank |
| Rebekah | Texer |
| Barb | Triscari |
| Stephanie | Turner |
| Jennifer | Wilker |
| Lorraine | Woodruff-Long |
Quaranteeny : Art and Quilt Show

I recently participated in a tiny art show contest. Which I had to turn into a quilt show. My original idea was to have a barn quilt show at the barn where I take all my finished photos. I stayed up way too late one night and sketched out and painted 1.5″ quilt blocks. I used watercolor paper and watercolor pencils.


The next morning I decided that they needed “frames.” I used black construction paper for the frames and I even used plain white paper to add mats to several of the tiny paintings. Now that I was off the track of pure barn quilts, I decided that my show needed some actual quilts. Or, actual mini pretend quilts. However you look at it, the show needed some stitches.
I used cuts of fabric in the 2″-3″ range that looked like quilts so that I would not have to do any piecing. I determined my sizes based on the viewers (robots) who would later be attending the art and quilt show. Some of the quilts are modern and some are more traditional. I backed my single cut of fabric with wool felt and quilted using straight lines. I did get a bit carried away and changed my thread colors about a million times more than necessary for quilting 5 miniature quilts.
Once the quilts were done, I needed some signage for my show. I went with “Quaranteeny” the name provided by @tinyartshow for the competition that inspired my tiny show.

And just for the fun of it, I added a pennant banner at the last minute to bring a little more color and cheer to the entire show.
First, I set up the show at the barn to take photos. This proved challenging because the sun was fully overhead and my assistants are under the age of 8. But we managed to get some photos of what I’m calling the “country fair” show.


When we came back to the house (from the public barn across the street – we did not break any social distancing protocols) I decided to set up the show on our front steps. We get quite a bit of foot traffic these days as people go on walks in the neighborhood.


I’m calling this version the “urban” setting. I even made a sign from sidewalk chalk to draw attention to my tiny show. It was fun to listen to people stop and talk about it while they were passing by on walks.


Here are some detailed photos of the pieces that hung in the show. There were 5 quilts and 9 paintings, plus the signs. This was probably the most enjoyable activity I have worked on since starting this stay home stuff over a month ago. Hopefully the photos can bring a little joy to you too.


The Hardest Thing I’ve Ever Sewn
I learned to sew as a child. I started with basic, straight line sewing. I worked my way through the 4H sewing curriculum, mostly garment sewing, and I also always made something for “sewing extras”, which just meant non-garment items; bags, toys, pouches, etc… Eventually, I was in the last year of my young 4H days and I made a five piece wool ensemble. It consisted of outer coat, long blazer (with lapels), plaid skirt (matched plaids!), black slacks, and shell top. You would think that would be the hardest thing I have ever sewn.
Well, it probably was up until last week when I started sewing masks. When the initial call for masks went out, going to medical workers, I knew that emotionally I would not be able to make those masks. The pressure of having kids at home for school, a husband who spiked a fever so we quarantined him in the basement, and all the other general household duties and tasks made me decide that making masks for the medical community was something I could not add to my plate.


However, when the CDC started waffling about recommending masks for general use, I knew this was something I could contribute to. I got a jump start and made 4 masks for nearby neighbors. Once the recommendation became official, I started sewing masks for friends and other neighborhood families. I have set myself a goal of sewing 100 masks. I do not know 100 people, but I am confident that the people I know do know 100 people, and I will be able to provide masks for them.

If you have sewn any masks, even just one for yourself, you will know that the pressure of the importance of what you are doing slams into you while cutting and sewing the masks. There were certainly times when I was pinning or sewing and blinking back tears.


This is what we do now. I kept saying it over in my head. I try to think how I can help in what feels like a helpless situation. I can stay home. I can sew masks. If you aren’t sewing masks because of life’s struggles of juggling work, kids, school, sick family, or even just emotional/mental capacity in these trying times, you should never feel bad. Do what you can. Stay home. Wear a mask in public. Stay healthy. And most importantly, know that we’ve all got each others backs in this crazy world we live in right now.
Current Mask Count: 94/100
20 yards of fabric, 5 needles, 4 spools of thread, 50+ hours of labor
Tips for Mask Wearing
If you received a reusable fabric mask made by me, you might have a few questions. I also have a few disclaimers to share.

How do I wash my fabric mask?
All the masks I’m making are 100% cotton. They are meant to be reused after appropriate laundering.
Machine wash. Tumble dry. But first, tie the ends together so they don’t get tangled. Place inside a sock, pillowcase, or delicates laundry bag. Make sure you wash your mask before using and then between each use. Even better if you can hang in the sun after laundering to make sure it’s completely dry. Exposure to UV could also help kill things that may be lingering.
How will this mask protect me?
IT WILL NOT PROTECT YOU. The intent of wearing this mask is to protect others by putting an additional barrier between your breath and them. Please continue to practice safe social distancing and remain at home except for critical business and necessary errands.
When should I wear my mask?
The Colorado Governor and the CDC recommend wearing face coverings anytime you are out in public. Good times to wear your mask are grocery shopping, curbside pickup, pharmacy visits, veterinary clinic visits, etc…
You can always call ahead to any place you are visiting to get more information about how they are handling social distancing and/or mask wearing.
How do I wear my mask?
These masks can be worn with either side facing out. Only wear it one way per use. Launder before turning it around to wear the other way. Pleats should face down, either way you wear it.
Place the top edge on the bridge of your nose. Tie the top ties behind your head, placed over your ears. Spread the pleats apart to fully cover your mouth and chin. Tie the bottom ties around your neck. Wear your mask as closely fitted as you can.
How do I handle a used mask?
Treat your used mask with care. Do not put it in a pocket or purse. A good thing I’ve read is to treat a used mask as you would a dirty diaper.
If your mask became damp from breathing, sweating, or weather, make sure you are not touching the mask. The moisture is a magnet and a growing ground for germs.
Make sure to always wash your hands after handling a used mask.
For more information on homemade fabric masks you can visit the Colorado Mask Project website.
Call for Quilt Blocks : Social Distancing

UPDATE : THIS CALL IS NOW CLOSED.
This is really happening. We are really smack in the middle of a serious world pandemic. This is not something we can ignore or just quasi-sympathize with because we are watching it on the news from across the world. It is here. It is in our own communities. In ALL of our communities. Schools are closing. Gatherings are being cancelled. Lives are changing. Who knows how this whole thing will play out?

What I do know is that as we are practicing “social distancing” from our actual neighbors, we as modern quilters, will turn to our community online. Our family of like-minded, sew until 2am because we’re trying to process what all this means, Quilters. We have always been a strong community, always been able to lean on each other in times of need, joy, celebration, and now in this time of anxiety and uncertainty.


I am putting out this call to help create a quilt that will embody the good and the bad of this entire situation. Make a block to express your emotion or just to distract yourself from reality. Each block is made from a 6.5″ background square and an embellished 4″ applique circle. Take inspiration for your block from Petri dishes.
If you would like to be part of this project, please follow the instructions below.
- Cut 6.5″ background square from Kona Snow, Kona White, or Kona Dove (other white or almost white solid fabrics will also work).
- Create a 4″ diameter circle template from cardstock or template paper.
- Piece, hand dye, embroider, and/or embellish a 4.75″ square. Use thread, fabric scraps, stitches, fabric dyes, and be creative. Hand or machine stitch your embellishments. Try to add more than just a simple single cut of fabric. Find inspiration on my Petri dish Pinterest board. Nothing too dimensional, please – I need to be able to press blocks flat.
- Use 4″ circle template and cut out circle of fabric from embellished 4.75″ square. Add 3/8″ seam allowance
- Center the circle on 6.5″ background square
- Hand applique a 4″ [finished] circle to the background. Use needle turned applique technique or use paper template to baste around and then applique – see my “Applique Circle Basting” story highlight on Instagram @loewensewen
- Message me @loewensewen on Instagram to get my address so you can mail your block
- Share on social media with #socialdistancingquilt and tag me @loewensewen
If you want to participate but don’t want to hand applique a circle, you are welcome to mail me your 4.75″ embellished square + 6.5″ background square and I’ll do the applique.


I hope that this can be a way to take your mind off the serious situation our world is facing right now, even for just a few minutes. I hope that this brings our strong quilting community together even closer than we already are. And I hope that your personal social distancing practices do not leave you feeling alone. We are all right here, and we are in this together.
QuiltCon 2020 Austin – Part Two

Read about QuiltCon HERE